Bdo where. All about houses: types, purchase and upgrade. Personal home. Fruits and flowers
Liked our site? Your reposts and ratings are the best praise for us!
This guide contains all the necessary information for the fastest and most comfortable pumping in Black Desert.
How to level up faster in BDO? Grind or quests?
Certainly the most fast way pumping in Black Desert Online counts as a grind, but if you're downloading the first character, we strongly recommend that you go through the storylines (up to about level 56) in order to get to know the game properly. At first, BDO seems very difficult, so accelerated leveling is only recommended for those who are confident in their abilities. It should also be noted that some quests (for example, from the Black Spirit) are mandatory for each character. As a reward for them, you can get additional slots in bags, knowledge points, energy and influence. If you miss important quests, you will still have to return to them later. That is why we advise you not to rush and upgrade at least one character on quests.
Leveling up in BDO with the help of friends
If your assistant has a high attack stat and you have all the experience buffs, leveling up to level 56 takes only 2 hours. And again, if you are leveling the first and main character, this method will not work for you, because this way you will not earn the required number of skill points and you will not be able to get talents. In other words, this leveling method should only be used if your friends are eager to help you further. Otherwise, you will be left without money and skill points.
You also need to remember that if the level of the assistant exceeds your own by 10 or more units, you will not receive loot.
Introduction
After creating a character, the game will offer you to go through training and visit different locations for beginners. If you are not playing for the first time, you can skip the tutorial. Training takes a lot of time and gives practically nothing (with the exception, perhaps, of movement skills).
If you are not in a hurry, you can buy yourself a wagon or complete the quest for a wagon in Velia. The wagon can hold potions and loot so you can grind in peace without having to return to town too often.
In addition, we recommend buying 2-3 pets from the in-game store. Pets will collect loot automatically and save you a lot of time. In fact, a pet is a prerequisite for a successful grind. If you don't have extra real money, try to buy a pet at the auction.
All points for pumping indicated in this guide have been repeatedly tested on European, North American and Russian servers. The characters were pumped without enchantments on equipment and without any special bonuses, so any other player can safely follow our recommendations. The equipment was obtained as it was pumped, that is, it fell from the killed monsters.
We also want to remind you that some classes (for example, the Valkyrie) level more slowly than others, so it would be wiser for them to look for a group.
- Use maximum experience buffs:
- +200% look for a channel with an activated bell
- +100% weekend bonus
- +50% war volume
- +30% premium set bonus
- +10% suit
- +200% for 1 hour or +100% for 2 hours - daily buff from achievements
- Some pets give +5% experience
- Events in the game, mainly related to holidays.
- Various consumables (sweets, bouquets, tea, beer). Basically, all this is taken at auction.
- Experience increases at night
- If this is your first character, then be sure to try to get a vehicle as soon as possible. It can be bought at the auction or received as a reward for one of the Starting Quests.
For the fastest pumping 1-60, use the items highlighted in green
Level 1 - 15
Level 1 - 9: Training
Once created, the character appears in a village called Olivia. If this is your first character, be sure to pass them introductory quests. To enable auto run, press the T key and set a point on the map. Sooner or later you will come running to the right place and you will be able to start training. Some players do not understand what to do in tutorial quests. In fact, everything is simple - you need to go to the mannequin and follow the instructions that are written at the top of the screen, that is, press the desired keys.
After that, the Black Spirit will give you another quest and send you to kill bugs. Open the Black Spirit's menu by pressing the "/" key. By this point you should be at level 5.
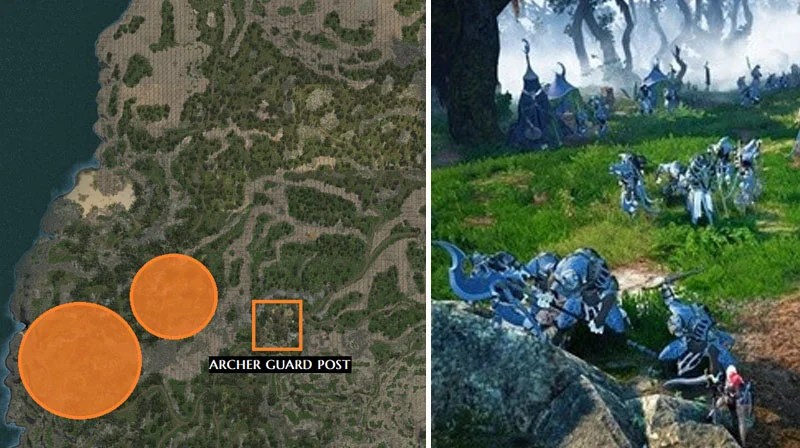
Reset the quest and run to the Western guard camp, killing all the monsters in your path. This will get you to level 9. If you don't know where the West Guard Camp is, look at the map:
Level 9 - 13: Hermit's Grove

- Monsters: Weak Treant (Melee), Mature Treant (Ranged), Young Treant (Melee)
- Experience: 3/5
- Difficulty: 1/5
- Mining:
- Tree Spirit Branch
These monsters pose no threat and are easy to kill. The ancients live mostly on the hills. Tree Spirit Branches can be sold to the merchant at the left entrance to the guard camp. Right click on an item in your inventory to see the merchant's location on the map.
After reaching level 13, return to the West Guard Camp and take the quest from Jareth Domongart, who is in the tent. Complete the quest - it will allow you to awaken the Black Spirit and upgrade items.
Level 13 - 15: Heidel Mine

- Monsters: Imp Miner (Melee), Lesser Imp Miner (Ranged)
- Experience: 4/5
- Difficulty: 2/5
- Mining:
- Rough Pickaxe
- Valuable amber [Crit. hit]
- Ain Garnet [Damage]
These are also very easy opponents. They stand comfortably and are easy to kill. Beware of small imps, as they attack with ranged combat. The packs also come across elite imps that impose the effect of periodic damage. They usually appear at the foot of the hill. The density of the monsters in the mine is quite high, so you can kill them without interruption. You can also farm an impressive amount of silver here, so if you need money, you can linger in the mine for a couple extra levels.
Level 15 – 24
Level 15 - 18: Moretti Plantation

- Monsters: Scarecrow (melee), Field Guardian (melee)
- Experience: 4/5
- Difficulty: 2/5
- Monster Density: 3/5
- Mining:
- Field Watcher's Necklace
- scarecrow stick
When fighting these monsters, be vigilant. They deal heavy damage and pose a threat to ill-equipped characters. There are also elite scarecrows in the packs, from which you can get Gloves of Ajeri. On different fields, monsters appear at different speeds. Change a few points to choose the best option for you.
Level 18 - 24: Castle ruins

- Monsters: Al Rhundi Rebel, Al Rhundi Sorcerer, Al Rhundi Archer (Ranged), Al Rhundi Warrior, Al Rhundi Pathfinder, Escort Soldier, Bodyguard
- Experience: 5/5
- Difficulty: 3/5
- Mining:
- Fragment of Legguard
- rusty helmet
- Helm of Ajeri
- Bronze dagger
- Ain long sword
- Valuable Beast Grenade [Damage]
This is a good place to grind, but it takes a big detour to get there. There are a large number of monsters in and out of the castle that can drop Rusted Helmets and Swords of Ain, as well as Bronze Daggers and Helmets of Ajeri. Bronze daggers are suitable for archers. If you manage to get such a dagger, wear it without taking it off. We advise you to kill the monsters in the castle, since that is where most of them are. Their loot list also includes armor pieces, crystals, and a decent starting weapon. All this can be sold and make good money.
Level 21 - 24: Glish Swamp

- Monsters: Swamp Naga Marauder, Swamp Naga Warrior and Swamp Naga Scout
- Experience: 3/5
- Difficulty: 3/5
- Monster Density: 3/5
- Mining:
- Naga gill
- Black Stone (weapon)
- Valuable Beast Grenade [Damage]
- Hesos earrings
- Sales Ax
- Black Stone (armor)
This place is suitable for those who do not want to run far. It is on the way from Platnation Moretti to the Bloody Monastery. If you are leveling the first character, we recommend that you still look into the castle and go to the swamps only if there are too many players in the castle. Good items and even black stones fall from nagas. All monsters attack in melee and are quite dense, so they can be hit by running in a circle. These packs also contain elite monsters that drop black stones, but you will have to work hard to kill them.
Level 24 – 35
Level 24 - 29/30: Blood Monastery

- Monsters: Sorcerer Cultist (Ranged), Giant Cultist, Warrior Cultist
- Experience: 5/5
- Difficulty: 3/5
- Mining:
- Black Stone (armor)
- old bandage
- old ax
- Amulet Helric
- Armor of Ajeri
The monsters in the Blood Monastery are mostly in the courtyard. Killing them is not difficult, especially if you do not cling too many at once. There is also an elite monster in the courtyard, but it can be killed with an AoE along with the rest. We recommend that you level up in the monastery to level 29, and then go to the bandit camp. In principle, you can go to the bandits at level 28, or you can level up in the monastery to level 32 and go to the Khuruto caves. If there are too many people in the monastery, you can kill monsters outside courtyard- the efficiency of such pumping, of course, will be a little lower, but at least you won't have to steal monsters from other players.
Level 29 - 34: Bandit Camp

- Monsters: Rogue Warrior, Rogue Giant, Rogue Archer
- Experience: 4/5
- Difficulty: 4/5
- Monster Density: 3/5
- Mining:
- Black Stone (weapon)
- Yuria's necklace
- Bracers of Health
- Ain Garnet [Damage]
- Gloves of Power
Try to bring the monsters to the Chests with the loot or go inside the fortress. All monsters, with the exception of archers, attack in melee. Bring packs to archers - it will be easier for you to use AoE abilities. Try not to step into traps - there are plenty of them in the bandit camp. The traps do some damage, but they make it hard to grind.
Level 28 - 34: Orc camp

- Monsters: Saizhek Veteran, Saizhek Berserker, Saizhek Warrior, Saizhek Scout, Saizhek, Young Saizhek, Saizhek Shaman (Ranged), Saizhek Officer
- Experience: 3/5
- Difficulty: 4/5
- Monster Density: 4/5
- Mining:
- Black Stone (armor)
- Sharp Fang of the Saizhek
- Saizhek's fang
- Valuable amber [Crit. hit]
- Ajeri shoes
This point seemed to us not very successful, so if you have the opportunity, head straight to the Khuruto caves or Biragi's lair. Saijacks are few here, and most of them attack in ranged combat. However, you can get black stones for weapons from them, so you should not completely write off this point. If you still decide to swing in the syjack camp, use AoE spells more actively.
Level 30 - 35: Castle of the Knights of Delpe

- Monsters: Harpy, Harpy Reaver
- Experience: 4/5
- Difficulty: 4/5
- Monster Density: 4/5
- Mining:
- Black Stone (armor)
- shiny feather
- Malachite I [Jump]
This point is well suited for leveling a sorceress, archer, wizard or sorceress, as they have abilities that allow you to shoot down harpies on the fly. If you are playing any other class, go elsewhere. Harpies fly fast and hit hard, but they aren't too hard to kill. Keep an eye on your health and you'll be fine. The most profitable packs are located on the top floor, where you can walk from wall to wall, constantly killing harpies. If you run out of potions, visit the merchant on the first floor.
Level 30 - 35: Khuruto Cave

- Monsters: Khuruto Shaman, Khuruto Fighter, Khuruto Scout, Khuruto Warrior, Khuruto Marauder
- Experience: 4/5
- Difficulty: 4/5
- Monster Density: 4/5
- Mining:
- Black Stone (weapon)
- Ax Kallis
- Earrings Tallis
- Amulet Juber
- Talisman Callis
- Lanyard Oros
This place is great for grinding. The cave is full of monsters, but you can also grind outside. In the absence of competitors, you will level up very quickly, combining leveling with earnings. The best packs are in the center of the cave, where you can swing without interruption. Collect as many monsters as possible and bring them to the shamans so that they do not have time to hit you with spells from afar. In addition, there is an elite monster on the stairs. He hits very hard, be careful with him.
Level 35 – 42
Level 35 - 40: Caphras Cave

- Monsters: Dark Archer, Possessed Giant, Dark Warrior, Dark Bandit, Possessed Mage
- Experience: 3/5
- Difficulty: 3/5
- Monster Density: 2/5
- Mining:
- Black Stone (armor)
- Armor Taritas
- Amulet Juber
- Talisman Callis
- piece of sculpture
- Dust of darkness
The entrance to the cave is located east of the village of Florin, in the Preserved Forest of Bree. There are more monsters in the depths of the cave than at the entrance. Wizards and archers deal heavy damage, but they can be quickly killed with AoE spells along with the rest. In general, the cave is not very suitable for grinding, and we recommend visiting it only if all other places are already occupied.
Level 35 - 40: Abandoned Mine

- Monsters: Infected
- Experience: 4/5
- Difficulty: 2/5
- Monster Density: 4/5
- Mining:
- Black Shard
- stigma
- Valuable Grenade [Attack Power]
- Shoes Taritas
- Gloves Taritas
This mine is inhabited by numerous monsters that can be killed with AoE spells. Remember that there is an elite monster in the center. He moves slowly, but hits very hard. The mine also has pylons that attack players with ranged attacks. If other players have chosen the cave, go north, you can also swing there. Do not forget to hand over the extracted junk to merchants in order to earn some money.
Level 38 - 40: Marnie's Abandoned Farm

- Monsters: Monsters of the ruins
- Experience: 3/5
- Difficulty: 4/5
- Monster Density: 3/5
- Mining:
- Tallis helmet
- Belt Tallis
- Rough Dark Crystal
- dust attraction
This is another optional point. It is not as good as the above options, but competitors on it are quite rare. The abandoned farm is inhabited by numerous monsters that you can upgrade and earn. These monsters are slow moving, but they have a lot of health, and for some classes, these circumstances cause tangible difficulties.
Level 38 - 42: Bree Reserve Forest

- Monsters: Ancient Tree, Round Ruin Tree, Faced Tree, Small Tree, Large Tree, Triangular Ruin Tree
- Experience: 3/5
- Difficulty: 4/5
- Monster Density: 2/5
- Mining:
- Black Stone (armor)
- Cursed Crystal
- piece of sculpture
- Armor of Dobart
This place can not be called successful. There are few monsters here, and they are far from each other. These monsters are fat, and in terms of prey, everything is also not very good. We advise you to keep this place as a fallback.
Level 42 – 50
Level 40 - 45: Evi Pass

- Monsters: Petrified Gnome, Petrified Miner, Petrified Frenzied Miner, Petrified Sapper, Petrified Worker
- Experience: 3/5
- Difficulty: 3/5
- Monster Density: 3/5
- Mining:
- silver ore
- Rough emerald
- Rough diamond
- Malachite [Fortitude]
Head to the center of the location, there are the most big packs. Do not go into the mines themselves - there is no one there. Beware of saws, they deal heavy damage and often block the path at the most inopportune moments.
Level 40 - 45: Marnie's Pass

- Monsters: Chimera, Horned Chimera
- Experience: 5/5
- Difficulty: 3/5
- Monster Density: 4/5
- Mining:
- Pares necklace
- Tallis necklace
- Valuable amber [Crit. hit]
- Valuable Grenade [Attack Power]
- Powder of Death
This is a great leveling point, especially if you know where the biggest packs are. However, this place is very popular, so be prepared for some competition. The optimal route looks like this: kill the pack in the ravine, climb the mountain, killing everyone in your path, and then go down into the ravine again.
Level 42 - 45: Sonile Base

- Monsters: Lizard, Sonil Elite, Sonil Warrior, Sonil Private, Sonil Archer, Sonil Elder
- Experience: 4/5
- Difficulty: 4/5
- Monster Density: 5/5
- Mining:
- Black Stone (weapon)
- Sales Ax
- steel dagger
- Luk Pares
- Armor Tallis
- piece of armor
This is a great place to level up and earn money. Relics can be obtained from monsters, which are auctioned for approximately 500,000 silver. If you do not really need money, relics can be turned into scrolls by laying them out in the form + in the inventory. Run around the camp, collect monsters and use AoE spells. Try not to stray too far from the mages. In the depths of the camp is an elite monster. Be careful, he hits very hard.
Level 44 - 45: Camp of the Giants

- Monsters: Giant Fighter, Giant Berserker, Giant Warrior, Giant Brawler, Spotted Hyena
- Experience: 5/5
- Difficulty: 3/5
- Monster Density: 5/5
- Mining:
- Boots Tallis
- ancient spear
- Ax Pares
- Tallis necklace
- Armor of Ajeri
Numerous monsters live in this camp, but you still have to look for a convenient place for the grind. It seemed to us that it was worth going deeper into the camp. Relics can be obtained from monsters, which are auctioned for approximately 500,000 silver. If you do not really need money, relics can be turned into scrolls by laying them out in the form + in the inventory.
Level 44 - 50: Forest of Manche

- Monsters: Spearman, Warrior, Brown Bear, Trap
- Experience: 5/5
- Difficulty: 3/5
- Monster Density: 5/5
- Mining:
- Faded Crystal
- Jeres shoes
- Ain Garnet [Damage]
- Powder of Battle
- Shield Axion
- Rourke's Lost Helmet
- Ring of Ent Hearing
- Ogre Necklace
- Tarnished Necklace
- Old Necklace
This is one of the last points when pumping up to level 50. The monsters here come in packs of 6, and it's easy to kill them with AoE spells. Pay special attention to the northern part of the location. Watch out for the big ogres - at least until you hit level 50. Later on, you will be able to farm the best amulets in the game from them. In addition, monsters in the Manche Forest drop scrolls to summon the goblin boss, as well as relics that can be sold at auction for an average of 500,000 silver. If you do not really need money, relics can be turned into scrolls by laying them out in the form + in the inventory.
Level 50 – 56
Level 45 - 52: Aquatic Camp

- Monsters: Merman, Elite Merman Fisher, Merchant Merchant, Merman Merchant, Fat Merman
- Experience: 5/5
- Difficulty: 3/5
- Monster Density: 5/5
- Mining:
- Black Stone (armor)
- Black Stone (weapon)
- Armor of Fortune
- Mystery Pouch
- Pink salmon
- silver carp
- Rourke's Lost Boots
- Helmet of Taritas, Helmet of Tallis, Helmet of Ajeri
- Ent Whisper Earrings
- Parem Belt
- Pares necklace
- Piece of Crystal from the Ancient Ruins
- Ain pomegranate
- Scroll of Summon Geass
Water camp is the best place for leveling up to level 50. A quest is also made here, which gives the Black Spirit at level 50. From the mermen living in the camp, you can get black stones for sharpening armor and weapons, as well as other useful items. Monsters appear very quickly and move in large groups, which increases the effectiveness of the grind. Here you can swing up to level 52 and even further, especially if you need money.
Level 50 - 55: Settlement of the Tugu clan

- Monsters: Tugu Clan Leader, Tugu Clan Hunter, Tugu Clan Fighter
- Experience: 5/5
- Difficulty: 3/5
- Monster Density: 5/5
- Mining:
- Black Stone (armor)
- Black Stone (weapon)
- Many types of weapons and armor
- Sekarr's necklace
- Eye of Assula Earrings
- Asula's Eye Ring
- Seal of the Ancient Guardians
- Worker's Potion
- Tugu Ornament Shard
- Eternal ban
These are quite complex monsters, so only those who have already collected good equipment (about 90 attacks) are suitable for the Tugu Clan Camp. In addition, this location has an elite monster that deals heavy ranged damage. In general, the point is well suited for pumping. You can go down into the mines, but without good equipment, killing the monsters in them will take too long.
Level 51 - 55: Ellik Temple

- Monsters: Caster Ellik, Cult Mage Ellik, Follower Ellik, Infested Swamp, Zealot Ellik
- Experience: 5/5
- Difficulty: 3/5
- Monster Density: 5/5
- Mining:
- Black Stone (armor)
- Black Stone (weapon)
- Zealot Proof
- Stones for Inlay
- Weapons of Kreia
- Armor of Strength
- Derek Leather Boots
- Asula's Eye Belt
- Outcast Ring
- Old books
- Eternal Ban
Monsters in the temple appear in packs of 4-6 pieces. They have a high chance to drop Black Gems, items from the Grunil set, and Kreia weapons, which can make good money. Most of the monsters attack in melee, but the priests use spells and can be quite a hassle. You can grind in the temple itself or in the mountains south of it. We recommend going to the mountains, as there you can find packs of 10 or more monsters.
Level 53 – 55 (90+ attacks): Poison Forest

- Monsters: Cloud Mushroom, Snow Mushroom, Tall Poison Mushroom, Floating Bubble Mushroom
- Experience: 4/5
- Difficulty: 3/5
- Monster Density: 4/5
- Mining:
- Black Stone (armor)
- Lemoria Shoes
- Voodoo doll Mansharu
- Breath of the forest
- life stone
- Pure black stone
Leveling in Polly's forest precedes awakening, that is, it is designed for levels 53-55. In terms of difficulty, the location is approximately equal to the Den of Wandering Thieves and the Lair of the Grie Tribe.
Poisoned mushrooms grow in the forest that deal 10 damage every 3 seconds. You will most likely need to actively use potions, especially if you are not killing monsters too quickly. Prey from mushrooms weighs a little, so you will only have to return or send a maid for potions. When you go to Polly's Forest, be sure to take your tools to collect resources with you. Best Items, which can be obtained from mushrooms, are equipment from the Lemoria set and Mansharu Voodoo Doll. Dolls are needed to create scrolls (similar to relics).
Level 52 - 58: Fort Saosh (100+ attacks)

- Monsters: Rebel Spearman, Rebel Rifle Warrior, Rebel Thief Warrior
- Experience: 5/5
- Difficulty: 4/5
- Monster Density: 5/5
- Mining:
- Black Stone (armor)
- Black Stone (weapon)
- Weapons of Kreia
- Health and Grunil Set Parts
- Shultz Gladiator's Belt
- Schulz's Gladiator's Necklace
- Inlay Stones
- Red Nose Summon Scroll
- Eternal Ban
The water fort is one of the best places to level 54 and up. Here you can swing up to level 56-57, along the way collecting equipment for more complex locations. If you haven't dressed yet, look for a group. Remember that monsters from the fort deal heavy damage and can knock back opponents. From them you can get items from the set of health and Grunil, weapons of Kreia, as well as black stones. Nearby are the Spider Village and Sarma Fortification, where you can buy potions and sell junk. In addition, you can rent a house nearby and use it as a warehouse.
Level 55 – 57 (100+ attacks): Ingan Fort
- Monsters: Ingan Warrior, Ingan Infantryman, Ingan Archer, Ingan Sorcerer
- Experience: 5/5
- Difficulty: 3/5
- Monster Density: 5/5
- Mining:
- Black Stone (armor)
- Ingan Armor Shard
- Protective Stone
- Helm of Lemoria
- Lemoria Gloves
- Voodoo doll Mansharu
- Pure black stone
- Fury of the Forest
Ingan Fort is a leveling zone from level 55 to 57. It looks like a water fort.
Monsters in the fort have low health and die quickly. We recommend running between the rocks, however, it is worth remembering that this place is very popular. Nearby is a camp where you can buy potions or repair equipment. The best items to loot from the Ingans are the Lemoria Set Gear, Fury of the Forest, and the Mansharu Voodoo Doll. Dolls are needed to create scrolls (similar to relics).
Level 55 - 58: Pirate Island

- Monsters: Drunken Treasure Seeker, Deck Fighter, Elite Fighter, Elite Pirate Gladiator
- Experience: 5/5
- Difficulty: 5/5
- Monster Density: 5/5
- Mining:
- Black Stone (armor)
- Black Stone (weapon)
- Red coral ring
- Blue coral ring
- Red coral earrings
- Blue coral earrings
Pirates appear on two islands, the most convenient point for grinding is located on the northern island. The location is intended for pumping in a group of 5 players. This is probably the best place to level up to level 60. If you have not had time to dress well, be careful not to cling to too large packs. If you are well dressed, you can grind alone or with a partner in the east or west. To get to the island, you need a ship and a horse to transport the booty. Instead of a fishing boat, you can use the Epheria Escort, as it has a larger capacity. There are merchants in the port on the island where you can buy potions, repair equipment and exchange currency.
Level 56 and above
Level 56 and up (100+ Attacks): Bashim Camp

- Monsters: Calla Pikeman, Calla Commander, Calla Veteran, Kurd Spearman, Ohonsei, Ohonsei Mage
- Experience: 4/5
- Difficulty: 3/5
- Monster Density: 3/5
- Mining:
- Weapon Rozhar
- Black Stone (armor)
- Black Stone (weapon)
- Asula's Ring of the Lost Enchantment
This location is located inside the canyon. There are a lot of monsters in it, but they are unlikely to be enough for a group. The Bashim area is not in the desert, so you don't need purified water and star anise tea. Monsters in this location do not drop unique items, but you can level there if your equipment leaves much to be desired. Loot includes items from the Roshar set, as well as black and gemstones that can be earned. If you want to farm pure silver, we advise you to head to the Water Fort.
Level 56 and up (110+ attacks): Desert Castle

- Monsters: Desert Naga Guardian, Desert Naga Commander, Desert Naga Priest, Desert Naga Warrior
- Experience: 4/5
- Difficulty: 3/5
- Monster Density: 4/5
- Mining:
- Rochava Gloves
- Black Stone (armor)
- Black Stone (weapon)
- Serap necklace
- Scrolls with text in ancient language
- Asula's Lost Spell Earrings
- Traveler's Card
The desert area is located near the Eastern Bazaar, in the desert, that is, you will need purified water and star anise tea. The horse can be left with the node manager. The Desert Area is inhabited by numerous monsters that are easy to defeat. As loot, you can get black stones, Serap Necklace and Scrolls with text in an ancient language.
Level 56 and up (110+ attacks): Titum Valley

- Monsters: Desert Fogan Guardian, Desert Fogan Warrior, Desert Tumbleweed Fogan, Desert Fogan Soothsayer, Desert Fogan Sentinel
- Experience: 5/5
- Difficulty: 3/5
- Monster Density: 4/5
- Mining:
- Serap necklace
- Rohava shoes
- Black Stone (armor)
- Black Stone (weapon)
- Scroll with Ancient Tongue Text
- Compass Detail
- Asula's Lost Spell Ring
- Garnet III Accuracy
Titum Valley is far out in the desert and hard to find without a compass. Going there, stock up on purified water and star anise tea. The horse can be left in the valley. There are many monsters in the Titum Valley, but they do not pose much of a threat. Despite the fact that it is very profitable to grind in the Titum Valley, few players go there - apparently, they are intimidated by the need to travel through the desert.
Level 56 and up (145+ attacks): Forgotten Ruins

- Monsters: Commander of the Forgotten Ruins, Guardian of the Forgotten Ruins, Kadri Gladiator, Kadri Sorcerer, Kadri Warrior
- Experience: 3/5
- Difficulty: 4/5
- Monster Density: 4/5
- Mining:
- Black Stone (armor)
- Black Stone (weapon)
- Weapon Roshar
- Serap necklace
- Ring of the Ruin Protector
- Scroll with Ancient Tongue Text
- Asula's Belt of the Lost Spells
- Pomegranate III Crit. Hit
Forgotten ruins are far from the most comfortable spot for the grind, but you can get some rare items there. The ruins are located in the west of Valencia, not in the desert, not far from the Oriental Bazaar. There are plenty of monsters in the ruins, but they are all very strong, so characters with bad equipment have a hard time. Loot: black stones, Roshar weapons, Scrolls with text in an ancient language. In addition, here you can get hold of the Ring of the Protector of the Ruins. The ring is assembled from several parts. Serap's necklace drops only from monsters.
Level 56 and up (130+): Rogue's Rift

- Monsters: Sand Marauder, Sand Assassin, Sand Elite Warrior, Sand Shooter
- Experience: 3/5
- Difficulty: 2/5
- Monster Density: 3/5
- Mining:
- Black Stone (armor)
- Black Stone (weapon)
- Weapon Roshar
- Serap necklace
- Scroll with Ancient Tongue Text
- Black Spirit Talon Fragment
- Asula's Lost Spell Earrings
- Amethyst III Barrier
Thieves' Gorge is located near Shakatu, not in the desert. Optimal requirements: 175 attack / 220 defense. One of the best spots for pumping. The only downside is a lot of competition.
Level 56 and up (150+ attacks): Crescent Temple

- Monsters: Crescent Sentinel, Crescent Cultist Sonil, Crescent Guardian Sonil, Lizard Guardian
- Experience: 4/5
- Difficulty: 4/5
- Monster Density: 4/5
- Mining:
- Black Stone (armor)
- Black Stone (weapon)
- Ring of the Temple Protector
- Serap necklace
- Scroll with Ancient Tongue Text
- rusty ring
- Asula's Belt of Lost Spells
- Malachite III Fortitude
The Crescent Temple is in the desert, so you'll need a compass. Going there, stock up on purified water and star anise tea to get rid of desert debuffs. There are a lot of monsters in the temple, and they are very strong, so this point is for characters with good equipment. Even if you're grinding in a group, don't forget to keep an eye on your health levels. Temple monsters are immune to knockback and this is very annoying. Optimal requirements 175AP/220-230DP. This place is very popular, as here you can get rare loot - black stones, Serap Necklace and Scrolls with text in an ancient language, as well as the Ring of the Temple Protector. The ring can drop in a "clean" form or as a Rusty ring that needs to be cleaned.
Level 57 and up (180+ attacks): Serpent Valley

- Monsters: Lurking Basilisk, Basilisk Caretaker, Basilisk Puppeteer
- Experience: 4/5
- Difficulty: 4/5
- Monster Density: 4/5
- Mining:
- Black Stone (armor)
- Black Stone (weapon)
- Armor of Rohava
- Basilisk Belt
- Basilisk Belt Parts
- Scroll with Ancient Tongue Text
- Asula's Belt of Lost Spells
Valley of the Serpents is located in the west of Valencia, not far from Altinova, where you can repair equipment and sell junk. Basilisk Gorge is teeming with complex monsters. If you are not well dressed, keep a close eye on your health level. Optimal requirements: 185AP/230DP. The gorge is very popular because here you can get rare loot - black stones, Scrolls with text in an ancient language, items from the Rohava set, gems and the Basilisk Belt, which is also assembled from parts.
Level 57 and up (170+ attacks): Taftar Plain

- Monsters: Centaur Ax Warrior, Centaur Hunter, Centaur
- Experience: 3/5
- Difficulty: 4/5
- Monster Density: 3/5
- Mining:
- Black Stone (armor)
- Black Stone (weapon)
- Helm of Rochava
- Belt of the Centaur
- old belt
- Scroll with Ancient Tongue Text
- Asula's Lost Spell Necklace
- Amethyst III Speed skills
The Taftar Plain is located in the west of Valencia, not far from the Oriental Bazaar. There are not very many monsters on it, they walk in groups of 6-7 pieces, quite far from each other. Centaurs are immune to knockdowns, so the fight with them can not be called easy. Optimal requirements: 190AP/230DP. The Taftar Plain is not particularly popular with players, as leveling on it is not particularly effective. As loot, you can get black stones, Rohav's Helmet, Centaur's Belt and gems.
Level 58 and above
Level 58 and up (190+ attacks): Navan Meadow

- Monsters: Griffin, Perice Mounts, Royal Griffin, Black Panther
- Experience: 4/5
- Difficulty: 4/5
- Monster Density: 4/5
- Mining:
- Black Stone (weapon)
- Destruction Stone
- Stone of Life
- Griffin Helmet
- Voodoo doll Mansharu
- Breath of the forest
- Pure black stone
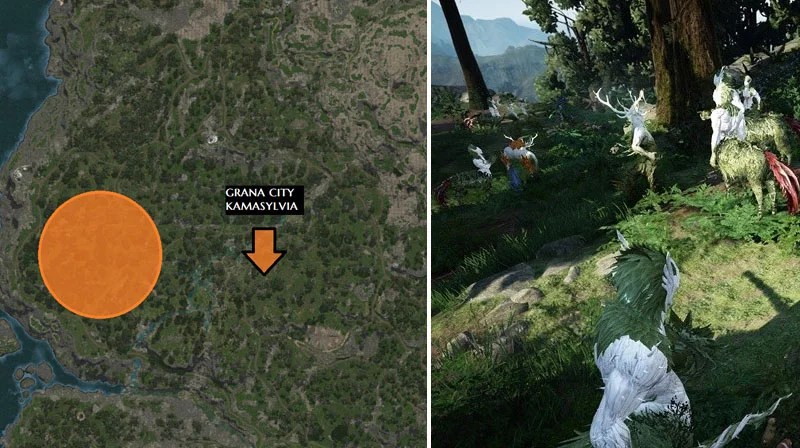
Navan Meadow is for characters level 58 and above. Unlike other locations from the first part of Kamasylvia, meadow grinding does not require the best equipment, and therefore this place is very popular. For an effective grind, find a group and stock up on food and potions. By the amount of experience, the meadow of Navan can be compared with the Thicket of the ancient sages. If you only need money, look at other locations.
There are a variety of monsters in the meadow, and we recommend that you study their abilities in advance. Feathered Wolves are the best target for grinding (assuming you don't need gryphon claws for the potion of the same name). Feathered wolves appear in large groups and are able to knock back opponents. Be carefull! Fnils, black panthers, elephants and peris can also be found in the meadow. Try not to pick up extra monsters if you are not confident in your abilities. Griffin's Helm drops from normal and royal griffins.
Level 58 and up (190+ attacks): Sulfur Mine

- Monsters: Lava Predator, Lava Paparun, Lava Touka, Lava Seeker, Lava Paorun, Lava Taorun
- Experience: 3/5
- Difficulty: 4/5
- Monster Density: 3/5
- Mining:
- Black Stone (armor)
- Black Stone (weapon)
- Sichil necklace
- Scroll with Ancient Tongue Text
- Fragment of an unknown map
- Compass part
- Traveler's Card
- Black Spirit Claw Fragment
- Dirty Sicil Necklace
- Blue Sulfur
- Amethyst III Barrier
Sulfur factories are located in the northeast of Valencia. You can get there from the capital by leaving your camel or horse at the entrance. Workshops are not considered deserts, but they are inhabited by dangerous monsters. Go there with a group. If there is no group, kill the monsters outside. Loot: black stones, scrolls with text in an ancient language and parts for the compass. You can also get the Sichil Necklace (rusted or finished, as is the case with the ring from the Temple of the Crescent Moon).
Level 58 and up (200+ attacks): Pillap Prison

- Monsters: Adept of Caphras, Iron Hand Jailer, Vicious Executioner, Crazed Hooligan
- Experience: 3/5
- Difficulty: 4/5
- Monster Density: 5/5
- Mining:
- Sichil necklace
- Scroll with Ancient Tongue Text
- Fragment of an unknown map
- Compass part
- Traveler's Card
- Black Spirit Claw Fragment
- Dirty Sicil Necklace
- Malachite III Speed
- The Lost Part of the Forbidden Book
Pillap Prison is located in the southeast of Valencia, near the city of criminals Muicun. If you are an outlaw, getting to the prison is not difficult. Otherwise, a long and tiring journey awaits you. The prison is not considered a desert, there are a lot of monsters in them, the location itself is just huge, so you can grind in it without stopping. The only difficulty is that the monsters have a large supply of health and impressive attack power.
Level 59 and up (210+ attacks): Mansharu Forest

- Monsters: Mansharu Fighter, Mansharu Hunter, Mansharu Warrior, Mansharu Priest
- Experience: 4/5
- Difficulty: 4/5
- Monster Density: 5/5
- Mining:
- Black Stone (weapon)
- forest fury
- Protective Stone
- Voodoo doll Mansharu
- Particle of the earth
- Pure black stone
- Gloves and Shoes Lemoria
- Karnak's necklace
Mansharu Forest is a location reserved for high-level characters (59+). Very dangerous monsters live here, for defeating which it is highly desirable to have a Kutum weapon.
Most likely, you will need a group, but not of five, but of three players, since only three Treasures fall from monsters. Keep a close eye on Priests and Hunters - they deal the most damage and need to be killed first.
Level 59 and up (220+ attacks): Forest of Alv
- Monsters: Warrior Lonaros, Scout Lonaros, Archer Lonaros
- Experience: 4/5
- Difficulty: 5/5
- Monster Density: 4/5
- Mining:
- Black Stone (armor)
- forest fury
- Ring of Lonaros
- Protective Stone
- Voodoo doll Mansharu
- Breath of the forest
- Ring of Lonaros
- Lemoria Gloves
- Particle of the Earth
Lonaros is a location intended for players level 59 and above. It is similar to Pillap Jail, it requires a group to grind successfully.
Lonaros is not very popular with players because it is difficult to grind there, and many prefer gryphons. In this location, you can get the Ring of Lonaros, but it is considered to be inferior to the Ring of the Temple Protector.
Level 60 and up (230+ attacks): Temple of Anacreon / Ruins of Hystria

- Monsters: Anacreon Guardian, Anacreon Guardian, Anacreon Executioner, Anacreon Constructor, Anacreon Ancient Guardian
- Experience: 3/5
- Difficulty: 5/5
- Monster Density: 5/5
- Mining:
- Black Stone (armor)
- Black Stone (weapon)
- Scroll with Ancient Tongue Text
- Detail of a Good Compass
- Secret Organization Badge
- Black Ancient Shard
- Compass Detail
- Traveler's Card
- Inlay Stones
- Tunra necklace
These locations can only be reached through a portal that randomly spawns in the desert. Both of them are particularly difficult and designed for groups. It is believed that the Temple of Anacreon is easier than the Ruins of Hystria, but it is not suitable for a solo passage. The passage of these locations does not give too much experience and money, however, you can get rare materials for creating Tunra Earrings, as well as black stones, spare parts for the compass and Scrolls with texts in the ancient language. To get to the Temple of Anacreon or the Ruins of Hystria, you need to level up to level 59-60, collect good equipment and find yourself a group.
Level 60 and up (230+ attacks): Mirumog Forest Ruins

- Monsters: Corrupted Watcher Tree, Corrupted Guardian Tree, Mirumog, Ant Ghost
- Experience: 4/5
- Difficulty: 5/5
- Monster Density: 3/5
- Mining:
- Young Ent Bark
- Pure black stone
- Breath of the forest
- Helmet and Armor of Lemoria
- Veltar's Belt of Radiance
- Voodoo Mansharou Doll
- Fury of the Forest
- Breath of the Forest
- Mote of Wind
Mirumog Forest Ruins is for characters level 60 and above. They are similar in difficulty to the Hystria Ruins, meaning you will need a group to complete.
Poplars-observers and Old poplars deserve special attention. They deal heavy damage, and observers also explode before dying, placing a debuff on players.
Level 60 and up (240+ attacks): Temple of Gyfinrasia

- Monsters: Ancient Arcane Weapon, Ancient Detection Weapon, Ancient War Weapon
- Experience: 5/5
- Difficulty: 5/5
- Monster Density: 5/5
- Mining:
- Black Stone (armor)
- Destruction Stone
- forest fury
- Lemoria Set Parts
- moonlight stone
- Tunra Belt
- Mote of Wind
The Temple of Gayfinrasia is for characters level 60 and above. It is similar in difficulty to the Temple of Hystria, meaning it is one of the hardest locations in the game. Optimal requirements: 220+AP, 280+DP, Kutum weapon.
Towers are placed throughout the location, which must be destroyed first. Monsters appear in packs of 3 and have a large supply of health, so we recommend gathering a group for a hike. The Temple of Gayfinrasia is considered the top content for well-dressed characters, and you can get a lot of experience and silver here.
In addition, temple monsters drop the best belt in the game, Tunra's Belt, as well as Forest Fury, which is used to craft new gems.
Milk and eggs
Can be traded in Heidel and Northern Wheatfield for Fragrant Food, Cooking Byproduct, or Milking a Cow. The procedure is a mini-game in which it is necessary to press the mouse buttons in turn, having managed to fill the vessel in 30 seconds. In the process, the energy of the character is spent. You can find dairy cows near Olivia and at Ranch Faars near Calpheon.
Eggs, like chicken meat, are harvested by workers on the nodes Pinto Plantation, Bartali Farm.
Flour
It is obtained by grinding cereals (potatoes, sweet potatoes, wheat, barley, corn). The crafting menu is activated by pressing the L button. The amount of flour obtained depends on the character's crafting skill level.
Cereals
Workers are mined on nodes:
Sweet Potato - Suri Farm;
Potato - Lodge Farm, Pinto Plantation, Bartali Farm;
Wheat - Moretti Big Plantation, Costa Farm, North Wheat Field,
Corn - Tuscany Farm;
Barley - North Wheat Field;
On the same nodes, you can collect cereals manually by equipping a sickle.
Vegetables and spices
Vegetables include tomato, pumpkin, cabbage, olive. You can get it when harvesting from the corresponding plant or grow it in the garden. The same applies to spices - red and black pepper, aloe, onion, garlic. Aloe can also be harvested by slaves at Ahto's Farm.
Fruits and flowers
Strawberries and grapes can be grown in the garden. In addition, grapes can be harvested in Olivia and Velia. Tulips and roses can be harvested from plants (you'll find entire fields near the Calpheon Capital) or grown. Sunflowers - only grow in the garden. The rest of the fruit, except grapes, is sold by the fruit merchant Milano Bellucci in the Calpheon Capital.
Mushrooms
Grow all over the map. Most mushrooms are in the forests of Calpheon, but they can also be found in the desert. Any type of mushroom, except for truffles, is grown in the garden (truffle spores are not available in the game). Some mushrooms can be bought from Brandio in the Calpheon Capital (in the same building as the storekeeper Basquin).
Honey
In the Balenos Forest, you can rent a training gun from NPC Daphne for influence points. Nearby in the forest on the trees there are nests of wild bees, knocking down which, you can pick up a hive of wild bees. Grinding 3 beehives will give you one or more servings of honey or good honey (green quality). Please note that it is not possible to bring down a hive with a matchlock gun used for hunting. In much larger volumes, honey can be mined by slaves at the Alejandro Farm.
Fish and seafood
They are caught with a bait in most water bodies (except for the smallest puddles). Seafood includes: turtle, shellfish, squid, crayfish, jellyfish, crab, starfish, octopus, seahorse. All other living creatures caught on a bait are fish. Dried fish, two portions of which in cooking can replace one raw fish, can be harvested by workers on the islands of Ruviano, Efde Run, Beiruwa, Fusara, Dellinhart, Orfs, Ruruba, Staren, Albresso, Varaterra, Randis, Serka, Vaeja, Modrik and Grenada.
Meat
Animal meat: raccoon, wolf, wild boar, fox, ferret, stone rhinoceros, lamb, beef, venison, bear meat.
Poultry meat: chicken, yellow-billed, flamingo
Tough Meat: Lizard, Waragon, Worm, Waste Dragon.
It, as well as snake and scorpion meat, can be harvested with a cleaver from the carcass of a dead animal (with the exception of chicken meat). Salt, Sugar, Butter, Garden Salt, Olive Oil, Grapeseed Oil, Yeast, Cooking Water, Sauce Base are sold by any NPC chef (as well as chefs and innkeepers).
Alchemy Ingredients
Herbs
They, as well as weeds, calendula and azalea, can be obtained by collecting wild and forest herbs with a sickle and grown in the garden. Can get slaves on nodes:
Calendula - Forest of Balenos, Ruins of the fortress wall;
Azalea - Lynch Farm Ruins, Serendia Western Plain.
Blood
Cold - bat, lizard, yellow-billed, worm;
Giants - troll, bear, ogre, dinosaur,
Dark - flamingo, wolf, wasteland dragon, buffalo.
Brown - sheep, deer, bison, waragon, pig;
Animals - foxes, raccoons, ferrets, monkeys.
You can collect blood with a syringe from the carcass of a dead animal.
Gathering from the trees
The juice from the tree can be collected with a syringe. In this case, there is a possibility of dropping a knot of a bloody tree, the bark of an old tree, a branch of a monk, a magic leaf, a red kidney. The same ingredients can be obtained by harvesting wood with an ax.
Fruit
These include the fruits of the sun, the ocean, charm, magic, storm, absolute, destruction, nature. Each of the fruits can be randomly obtained when collecting plants with a sickle, including in the garden.
Dust
Can be dropped when characters mine stones and ores with a pickaxe. Many types of dust as a by-product are received by workers sent to ore harvesting. Depends on the type:
Dust of fire - copper and titanium ore;
Ages - zinc and lead;
Darkness is iron
Destruction - coal,
Attractions - tin ore.
Most types of ores are mined at many nodes scattered throughout the map. Tin ore can only be mined at the Heads of the Bear River in Calpheon.
Powders
Workers are mined on nodes:
Varvarov - The ruins of the Lynch farm;
Powder of Chaos - Dig Site;
Ashes - Forest Manche, Ruya Tree;
Lands - Dig Site, Stone Hall of the Ancients;
Primordials - Glish Ruins;
Battles - Bernito's Farm;
Pochinki - Stone Hall of the Ancients;
Hunters - Glish Ruins, Lynch Farm Ruins;
Harm - Les Manche;
Remembrance - Sanctuary of the Pilgrims: Modesty.
Powder of Death is dropped from the undead in the Hexa Cemetery and the Knight's Cemetery, it is impossible to get it in any other way. The shining powder needed to make alchemy stones is sometimes created as a by-product.
A few words about the beds
In Black Desert, the vegetable garden allows you to not only reduce the time it takes to find resources, but also grow green and blue quality ingredients. Cultivated in the garden:
Cereals;
Spices;
Vegetables;
Fruit;
Flowers;
Mushrooms;
Herbs.
Keep in mind that some types of ingredients cannot be obtained in any way other than growing in the garden. When weeding the beds, you can collect weeds, a branch of a monk, a magic leaf. In addition to plants, you can grow chickens and cows in the garden:
Chicken nest. Crafted by grinding 20 Rough Stones and 100 Barley. Allows you to get eggs and chicken meat. Occupies 3 slots.
A stack of hay. Crafted by drying 50 weeds. Allows you to get milk and beef. Occupies 4 slots.
Like cultivated crops, chicken nests and a haystack can be green blue quality - good and choice, respectively.
To buy houses, you need influence points:
Please note that the description says how many points have been spent on houses so far. These points are earned by completing missions. You can always get them back by selling the house. However, be careful. Points, especially at the beginning of the game, will not be so much. Also, you may need silver to buy a house. Unlike influence points, when selling a house, silver is not returned.
In every city and in some nodes, you can buy a house. The largest groups of houses are in Heidel and in Calpheon. In this guide, I will focus on the house lines in Velia, Heidel, Glish, and Calpheon, as these are the ones players most often use to establish trade connections and open house lines.
How to buy a house?
In order to purchase a house, press the "M" key to open the map and find the city on it:
Then click on this icon with the left mouse button. Here, for example, what will appear if you select Heidel:

1. - means that the house has not yet been purchased and is necessary for the opening or continuation of a group of houses.
2. - means that the house is bought and built. The icon in the right corner is the type of house, I will talk about this later.
3. - means that the house has not yet been bought.
4. - means that the house is bought and in the process of construction.
Let's use the example of group 1 in Heidel to understand how to buy a house and how the group of houses works. Select the "blue" house in the group (this is 1-1):

1. - one of the purchase options. Make no mistake with the choice.
2. - bonuses and house level differences.
3. - buy button.
4. - Influence points needed to buy this house.
5. - your current influence points.
6. - time of construction.
7. - the cost of construction.
8. - your current amount of silver.
9. - internal view.
Then click "Purchase" and see the following window:

Here you can once again find out how much the purchase will take away influence points and how long it will last. If the building also requires silver, then the window will look like this:

Also, you can purchase several houses of the group at once. To do this, we can click on the "gray" house in the group (this is 1-2):

And then - "View the terms of the purchase." Here we can see which houses of the group need to be bought in order to open the desired house and even buy them with one button "Complex purchase":

Some houses have two or even three floors. To open houses on the first floor in a group, it is not necessary to buy houses on the second and third floors.
Subsequently, you can change the type of purchased home. If the purchase required silver, then the change will also need it.
Attention! If you sell or change the type of residential building, then all furniture and household items will be sent to a warehouse in the city in which you bought the house.
House types
There are several types or kinds of houses in Black Desert Online. As seen in the example, the type of house can be selected during construction.
Houses can be divided into the following types:
- Stock.
- Barracks.
- Stall.
- House.
- Production:
- Processing shop.
- Smelter.
- Sawmill.
- Craft:
- Armory.
- Forge.
- Plotnitskaya.
- Craft workshop.
- Jewelry repair shop.
- Dressing room.
- Workshops for improving weapons:
- Armor improvement workshops:
- Foundry.
- Workshop of siege weapons.
- Workshop.
- Furniture shop.
- Cart shop.
- Carriage workshop.
- Harness workshop.
- Shipyard.
- Boat workshop.
- Trading:
- Barn.
- Smelter.
- Sawmill.
- Mushroom farm.
- Fish shop.
What are all these houses for?
Stock- to increase the space in your warehouse in a particular city. Thus, buying a house with a warehouse in Heidel 1st lvl. will expand your warehouse in Heidel by 3 units.
barracks- to increase jobs for workers in a particular city. Workers can be used for work both in the city and at nodes that are connected to the city. Resources mined by workers are placed in a warehouse in the city.
Stall- to increase the space for horses in the stables of a particular city. By default, there are 3 places in the stable.
House necessary for your stay in it. It is an instance in which you can place furniture and household items.
House type "Production" are needed to process the resources mined by workers into black stone powder, ingots and other items.
House type "Craft" are needed to create and improve weapons and armor, as well as craft jewelry, costumes, equipment for mounts and other things.
trading houses needed to create trade packs.
Please note that when mining materials for crafting at remote nodes and transferring them to a city with production, if the node is not connected to the city, the cost of cargo transportation will be tripled.
House levels
Some of the houses have several levels. Players are usually interested in houses that can be upgraded several levels. In this case, you do not invest influence points, but upgrade the house for silver. That will maximize the benefits of the house. Warehouses will bring additional places in your warehouse in the city:
- 1 ur. - 3 places.
- Level 2 - 5 places.
- Level 3 - 8 places.
- 4 ur. - 12 seats.
- Level 5 - 16 seats.
Barracks will provide additional beds for workers:
- 1 ur. - 1 additional worker.
- Level 2 - 2 additional workers.
- Level 3 - 4 additional workers.
- 4 ur. - 6 additional workers.
- Level 5 - 8 additional workers.
Stalls - additional places in the stable:
- 1 ur. - 1 extra bed.
- Level 2 - 2 extra beds.
- Level 3 - 3 extra beds.
- 4 ur. - 4 extra beds.
- Level 5 - 5 extra beds.
Production houses will provide new crafting options.
Filters
The cities interface has a very convenient and practical filter-search by the following parameters:

Purchased or vacant houses

House type

house level
Houses of Velia
There are only 12 houses in Velia:
![]()
Types of houses in Velia*:
|
Quantity |
Max level |
Address |
|
|
Processing shop |
|||
|
foundry |
|||
|
Sawmill |
|||
|
Armory |
|||
|
Plotnitskaya |
|||
|
craft workshop |
3-2 1st floor, 5-2 |
||
|
mushroom farm |
|||
|
Fish shop |
Houses of Heidel
There are 59 houses in Heidel:
![]()
Heidel house types*:
|
Quantity |
Max level |
Address |
|
|
5-4 2nd floor, 6-4 2nd floor |
|||
|
8-1 4 office |
|||
|
Processing shop |
5-4 2nd floor, 8-1 5th office, 9-4 |
||
|
foundry |
|||
|
Sawmill |
|||
|
Armory |
|||
|
Plotnitskaya |
|||
|
craft workshop |
|||
|
3-3, 4-1 2nd floor, 4-2 2nd floor, 9-1 2nd floor |
|||
|
mushroom farm |
|||
|
Fish shop |
* - the table shows only houses that are important for upgrades. These are warehouses, barracks, production (processing shop, smelter and sawmill), craft (weapons, forge, carpentry, craft workshop and jewelry workshop) and trading houses (barn, smelter, sawmill, mushroom farm and fish shop). In the order listed.
Glish houses
There are only 6 houses in Glish:
![]()
Glish house types*:
* - the table shows only houses that are important for upgrades. These are warehouses, barracks, production (processing shop, smelter and sawmill), crafting (weapon shop, forge, carpentry, craft workshop and jewelry workshop) and trading houses (barn, smelter, sawmill, mushroom farm and fish shop). In the order listed.
Houses of Calpheon
There are 238 houses in Calpheon:
![]()
Calpheon House Types*:
|
Quantity |
Max level |
Address |
|
|
10 addresses |
|||
|
6 addresses |
|||
|
Processing shop |
7 addresses |
||
|
foundry |
|||
|
Sawmill |
|||
|
Armory |
Bazaar 3-6-2 |
||
|
Callis Square 1-4-2 floor |
|||
|
Plotnitskaya |
Bazaar 1-4 2nd floor |
||
|
craft workshop |
Bazaar 1-4 2nd floor |
||
|
mushroom farm |
|||
|
Fish shop |
* - the table shows only houses that are important for upgrades. These are warehouses, barracks, production (processing shop, smelter and sawmill), crafting (weapon shop, forge, carpentry, craft workshop and jewelry workshop) and trading houses (barn, smelter, sawmill, mushroom farm and fish shop). In the order listed.
Purchase
Hopefully, up to this point, you already have an idea about the house system and building an economic chain. Now let's talk about personal housing. I thought for some time in which city I should buy a house. It's still a long way to Calpheon, and I won't spend my time in Velia all the time. So the choice was obvious - Heidel.
Before buying a personal home, make sure that its interior design and size suits you:

I really like the exterior and interior of the houses in Black Desert, there is nothing to spoil the atmosphere of a small European city with medieval architecture. Personal houses in Heidel cost only 1 influence point, so you can buy different ones and see how they look. Due to these parameters, and also due to the convenient location near the main road of Heidel, I chose the house 2-1-1 in Heidel.
After buying a house, you will have the following menu in the upper right screen:

By clicking the left mouse button on the image of the house, you can pave the way to your personal home.
House Rating
A private home in Black Desert is an instance, so only you can use it. However, your friends and in general anyone can see what your house looks like. To do this, before entering the house, press "F1":


Refined and cute. I really like this style.
Furniture
Most of the furniture in Black Desert Online, in addition to being decorative, serves as buff stations, workbenches, and other functions. In addition to the methods indicated in this guide, any furniture can be bought at the auction. Here is how I furnished my house before writing the guide:

1, 2, 3, 6 are buff stations, I wrote about them in this guide. I recommend you read it, because it is very necessary for good farm and of course for PvP.
4 - bed. Accelerates the regeneration of energy points twice. You can buy a bed in a shop, or give a task to craft it to workers in a furniture workshop:

Or buy with friendship points in the furniture NPC mini-game:

5 - carpet. It does not give any bonuses, it is only needed for additional interior points. Can be purchased from an NPC or crafted at a furniture shop.
7 - plate. I wrote about it and cooking on it. But, in addition to buying from an NPC chef or receiving it as a quest reward, a stove can be crafted in a workshop:

It is worth noting that a higher-level slab can only be crafted in the workshop.
In addition to the listed things, you will need in the house: an alchemy table, an anvil and a bookcase. The rest of the furniture, such as vases, crockery, tables, chairs, is decorative. Also, while fishing, you can catch seashells. I will focus on what is really necessary.
The Alchemy Table can be purchased from the NPC Alchemist:

Or, by analogy with the stove, craft in the workshop.
Shelving with books is sold in the shop. On it, every 3600 sec. you can get random knowledge. While your character is reading, you can move around the house with the book:

Separately, I will tell about the anvil.
Anvil
The anvil can be purchased from the NPC blacksmith in Heidel:

But in order to use it, you need the knowledge of "Repair". To get this knowledge, find this anvil near the blacksmith NPC in Velia and talk to it:

It will take as much as 25 energy points, but believe me, it's worth it! Now, you can use the anvil. To do this, install it at home and press "R":

To repair equipment, move the item to the anvil interface and click "Repair". Unlike the repair of equipment at the NPC blacksmith, each item must be repaired individually. Once every 40 sec. you will recover 1 unit. strength:

Interior decoration
To place furniture in your home, you need to go to installation mode:

Then put the furniture you need:

1. - the number of interior points for a single item.
2. - the total number of interior points.
3. - interior points received when installing an item.
Furniture from the shop can be bought directly in this mode (marked with the “P” icon).
In this mode, it is very convenient to see how many consumable items have remaining durability.
In addition, here you can choose new wallpapers, curtains or parquet for your home. These items are bought in the shop, from NPCs or crafted in the workshop. In general, it is possible to distinguish between types of furniture and household items:
- Floor:
- Bed.
- Table.
- Chairs.
- Sofa.
- Cabinets.
- Shelving.
- Machine tools.
- Buff stations.
- Wall mounted:
- Curtains.
- Paintings.
- Lamps.
- Desktop:
- Tableware.
- Vases.
- Chandeliers.
- Wallpaper.
- Parquet.
The garden is a favorite pastime in MMORPG games, which allows the game character to start his own piece of land, plant seeds, take care of seedlings and, as a result, collect a valuable crop. In Black Desert Online, this exciting activity is even moved to a separate craft branch - "Harvest".
Many people get to know gardening in BDO thanks to story quest, which is given by the dwarf Jamkas Wormsbane at the Heidel Outpost node.
But the kitchen garden ("Wattle") of Dzhemkas is far from perfect - only one unit of crops can be planted on it. That is, seeds that require two slots for planting cannot be grown with such a fence. But it, unlike other fences, can be obtained completely free of charge.

For those who prefer a more serious gardening style, there are a few other options. It should immediately be noted that a garden in Black Desert cannot be bought for any money. It is taken exclusively for influence points on rent from certain NPCs (non-playable characters).
Where can I get a garden in Black Desert?
In total, there are four types of vegetable gardens in the game - fences (including the free Wattle of Jemkas Wormsbane).
The next vegetable garden in BDO can be rented from several NPCs, such as Martina at Pinto Plantation (near Velia) or Enzo at Diaz Farm (near Calpheon).

For only 3 influence points, this "Easy Fence" will allow a novice gardener to get their first experience in the "Harvest" craft and grow up to 4 seeds at the same time.
The third most useful vegetable garden is the Normal Fence, which can be obtained for 6 influence points, for example, from the owner of the wheat fields, Norma Wraith (node North Wheat Field).

The plot provided by the kind old lady Norma can accommodate up to 7 plants, which is quite more interesting than the previous land holding.
For avid gardeners who want to use their gardening skills to the maximum, there is a third and most extensive garden in Black Dessert- Strong fence.

In order to get it, you need 10 influence points and a trip to Calpheon (or Glish, for example) to a tool dealer. NPC Keranoa in the capital will be happy to provide this garden to everyone, provided, of course, that they have the necessary influence.
This fence will allow you to grow up to 10 plants at the same time, which is an absolute record among all other fences.
Also, one should not forget that in Black game Desert, it is possible to put several gardens at once, that is, if the player decides to seriously engage in gardening and horticulture, then you can find a good place, put a whole plantation there and enjoy working in the garden and harvesting.
How to assign a worker to take care of the garden in BDO?
Until recently, in Black Desert it was not possible to use hired labor to care for the growing crop. Which was very frustrating, because. even with the Scarecrow installed in the garden, pests still periodically encroach on the growing fruits, and you have to constantly monitor the condition of the seedlings so as not to lose the crop.
March 2, 2016, when game servers a new big update "Valencia. Golden Era”, the developers of the game made gardeners very happy with one of the innovations. You can now use a worker to care for crops in Black Desert.
Unfortunately, he cannot harvest and sow seeds, but he is quite capable of ensuring the unhindered cultivation of all seedlings without losing their quality and health. The owner of the garden will only have to plant the necessary plants, put the worker in the garden, and at the right time return for ripe and healthy fruits.
To order a worker to care for the garden (while he must be free from other tasks and have energy), you must click the "Garden" button on the upper left panel.


The menu that appears will show full list plots owned by the player, as well as their location and type. In the "Worker" tab, you should select the desired mercenary, while all the "subtleties" of the upcoming operation are clearly described in the task menu that opens.

Pressing the button will start gardening work. At the same time, in your garden you can observe this very mercenary. The “gardener” will finish his work only when all his energy runs out, and he will not leave to rest earlier, even if the entire crop is 100% ripe.

In such a simple way, you can make your life easier by learning how to send a worker to the Black Desert to take care of the garden.


